{$inline_image}
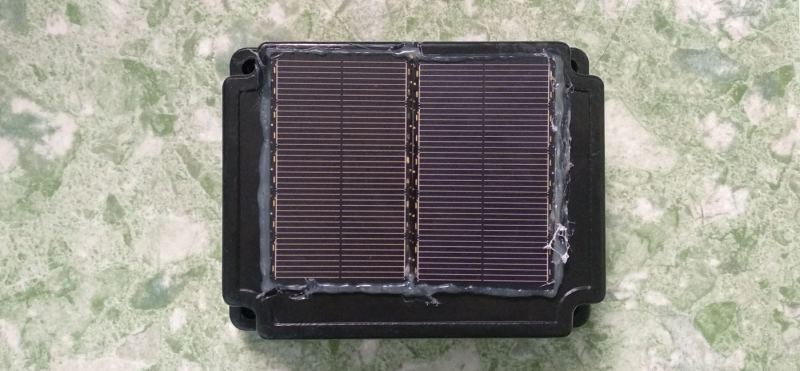
Throwies occupy a special place in hardware culture — a coin cell battery, LED, and a magnet that can be thrown into an inaccessible place and stick there as a little beacon of colored light. Many of us will fondly remember this as a first project. Alas, time marches inevitably on, and launching cheerful lights no longer teaches me new skills. With a nod to those simpler times, I’ve been working on the unusual idea of building a fully functional server that can be left in remote places and remain functional, like a throwie (please don’t actually throw it). It’s a little kooky, yet should still deliver a few years of occasional remote access if you leave it somewhere with sunlight.
A short while ago, I described the power stages for this solar-powered, cloud accessible Linux server. It only activates on demand, so a small solar cell and modest battery are sufficient to keep the whole show running.
Where we left off, I had a solar cell that could charge a battery, and provide regulated 12v and 5v output. For it to be a functional device, there are three high level problems to solve:
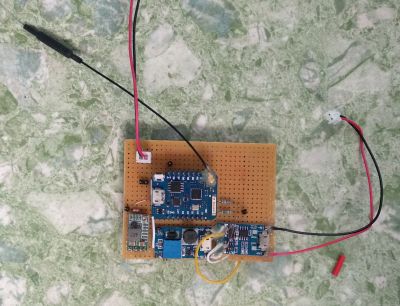
The funny thing is, this hardware reminds me of a satellite. Of course it’s not meant to go into space, but I do plan to put it somewhere not easy to get to again, it runs off of solar power, and there’s a special subsystem (ESP8266) to tend the power, check for remote activation, and turn the main computer (Raspberry Pi 3) on and off as necessary. This sounds a lot like space race tech, right?
As I have a bit more code than usual to share with you today, I’ll discuss the most interesting parts, and provide links to the full firmware files at the end of the article.
Device setup is a good place to start, and it has two components: the operating system on the Raspberry Pi 3 (in this case Raspbian Stretch Lite), and the low-power systems that control whether the Raspberry Pi 3 is turned on or off. In both cases, we handle this by scanning for a wireless network with known SSID (say from your mobile phone).
In Raspbian, this is pretty easy – we open up /etc/network/interfaces and set the priority of our configuration network to a high number:
network={
ssid = "setup network name"
psk = "setup network password"
priority = 999
}
For our power control hardware, there is a module available in NodeMCU called ‘end user setup’ that allows you to connect to the ESP8266 remotely, scan for networks, and connect to one of them, saving the credentials. All we need to do is selectively run a program containing it when a certain hotspot is in range:
function listap()
dofile('setup.lua')
end

scan_cfg = {}
scan_cfg.ssid = "setup network name"
scan_cfg.show_hidden = 1
wifi.sta.getap(scan_cfg, 1, listap)
Then in setup.lua, we run end user setup. This causes the ESP8266 to act as a hotspot named ‘SetupGadget’ followed by a few hex digits:
enduser_setup.start(
function()
print("Connected to wifi as:" .. wifi.sta.getip())
end,
function(err, str)
print("enduser_setup: Err #" .. err .. ": " .. str)
end
)

tmr.alarm(1,1000, 1, function() if wifi.sta.getip()==nil then print(" Wait for IP address!") else print("New IP address is "..wifi.sta.getip()) tmr.stop(1) node.dsleep(2000000) end end)
With this set up, we can connect the server and controlling hardware to a new wireless network without direct physical access. Solar power requires light, this is likely going to be on my roof, and I don’t relish the idea of climbing up to get it any time I need to reset my home WiFi password. If you have a really tall roof, build yourself a directional waveguide antenna — I’ve been able to get a range of over 100 meters this way, through several concrete buildings. There’s also Brian Benchoff’s 3D-printable ESP8266 dish antenna.
Next, we need to be able to remotely turn the server on or off. We’ll do this with MQTT pointed at a domain name that resolves to a cloud VPS. The only thing you’ll need on that VPS is the mosquito MQTT broker, so no sense in paying for a high-end server. Note that there are ways to implement some basic security here, but for the sake of brevity, I’ll leave that as an exercise for you to explore on your own.
Note that our hardware is only active occasionally – I’ve set it to wake up every 15 minutes or so to check the MQTT broker. To make sure it receives messages, the sender needs to set the “retain” flag when sending the activation command. This guarantees that the message will be there when the ESP8266 wakes up and checks for new messages, as long as we don’t replace it with some other retained message. A short example in Python for an MQTT broker at domain.com, and topic solarserver:
import paho.mqtt.client as mqtt #import the client
broker_address="domain.com"
client = mqtt.Client("P1") #create new instance
client.connect(broker_address, port=1883) #connect to broker
client.publish("solarserver", payload="activate", qos=0, retain=True)
On our ESP8266, we check for the command ‘activate’ and then run a program that turns on the Raspberry Pi 3:
ClientID = 'Node001'
m = mqtt.Client(ClientID, 120)

m:connect("domain.com", 1883, 0, function(client)
print("connected")
client:subscribe("/solarserver", 0, function(client) print("subscribe success") end)
end)

m:on("message", function(client, topic, data)
print(topic .. ":" )
if data ~= nil then
print(data)
if data == "activate" then
dofile('active.lua')
m:close()
end

end
end)
The program ‘active.lua’ raises a GPIO high to enable the 5v line to the Raspberry Pi 3, and monitors the battery voltage. If the battery voltage drops too low, or a shutdown command is received, it will cut power (shutting down first is a good idea).
What good does it do us though, if we can turn the device on but not access it? As I plan to move this device around for software demos, it would be great if I didn’t have to worry too much about firewalls, routers, and other drudgery that it might be behind. This is where we explore reverse SSH tunnels.
Normally, you establish an SSH connection because you want secure shell access to a remote machine, and have a certificate or username+password pair along with the address of the machine. In this situation, the address of the client and state of its network (the routers it is behind and so on) is not usually important, but the address of the server is assumed to be known and all port forwarding and firewall settings configured to accept the traffic.
In a reverse SSH connection, the server initiates a connection to the client that is used to allow the client to connect back to the server. On initiating the connection from server to client, you specify a port. When logged into the client, you use SSH to log in to localhost on that port, and the traffic will be sent to the server, allowing you to log in.
We’ll need to automate this process for it to be useful. The first step is to create a user (your_username in this example) with restricted access on your VPS. Our server will be automatically logging in to it, doing this with the root account is probably a terrible idea if you have anything there you remotely value. Note the password for this new user.
Next we power on the Raspberry Pi 3 (we’ll assume you use Raspbian Lite here), set a new root password, install autossh to manage the connection, create a new user (same name as the VPS user) with a certificate, and finally copy that certificate using SSH-copy-id to our VPS:
$apt-get install autossh
$useradd -m -s /bin/bash your_username
$su – your_username
$ssh-keygen -t ed25519
$ssh-copy-id your_username@(VPS IP address) -p 22
Then we run raspi-config to enable the SSH server and have that user automatically logged in at boot. Now we’re set up to log in to our VPS over SSH with certificates instead of a username+password pair, which is easier to automate. Let’s establish a reverse SSH tunnel from our Raspberry Pi 3 to test it:
$autossh -M 0 your_username@(VPS IP address) -p 22 -N -R 8081:localhost:22 -vvv
If that succeeds, you ought to be able to establish an SSH connection to your Raspberry Pi from your VPS via the command:
$ssh your_username@localhost -p 8081
Assuming that works as intended, we move on to creating a service that establishes that connection a few seconds after the network interfaces go up. We’ll do this with systemctl, but first we need to create a short shell script for systemctl to call. Create a file autossh.sh, make it executable (e.g. with chmod), and populate it with:
sleep 15
autossh -M 0 your_username@(VPS IP address) -p 22 -N -R 8081:localhost:22 -vvv
The ‘sleep 15’ waits for 15 seconds after network interfaces go up during boot. Without this, I found that the script runs slightly too early, and I cannot resolve the VPS host. There are more elegant ways to fix this, but this was the easiest. Now we create the service that runs this script with:
$systemctl edit --force --full autoautossh.service
We then enter the following, then save the file:
[Unit]
Description=My Script Service
Wants=network-online.target
After=network-online.target

[Service]
Type=simple
User=pi
WorkingDirectory=/home/your_username
ExecStart=/bin/bash /home/your_username/autossh.sh

[Install]
WantedBy=multi-user.target
Then we enable it and test it. After the second command, the reverse SSH tunnel should be operational and you can try it – if it doesn’t work now, it won’t work on boot either:
$systemctl enable autoautossh.service
$systemctl start autoautossh.service
If you have access now, then it ought to automatically establish the reverse SSH tunnel after boot, and also automatically re-establish it if it gets broken. If you’re having trouble with poor network connections, you might investigate Mosh as an alternative to SSH.
At this point, you’re more or less done: just plug the 5V output of your power stages into your Raspberry Pi and put it in a weatherproof box. When you send a retained message ‘activate’ to your MQTT topic, the server will turn on within 15 minutes or so. I recommend testing it and listening to the MQTT topic a while to make sure it all works as expected and so that you have an idea how long the battery lasts.
As promised, here is the full firmware source code. Dig through it an leave any questions you have in the comments section below. I’d also love to hear what you’d use a Linux throwie for?
The Linux Throwie: A Non-Spacefaring Satellite
Source: HackADay